Build Next.js apps with JWT authentication, Auth.js, and Xata
Use Xata and Auth․js on two Next․js apps: app directory and pages directory.
Written by
Attila Fassina
Published on
March 23, 2023
In this article we will explore how to get authentication working in your Next.js app using Auth.js and Xata. It's important to note that Next.js has at the moment two routing architectures that are defined via your project's file system:
- App: where routes are mapped in
/appdirectory - Pages: where routes are mapped in
/pagesdirectory
Working the conditions and conventions of each directory can get you with any routes landscape. Though there are fundamental differences on how you will think the data story depending on which architecture you choose. If you've been working (or has worked) with Next.js at any point until now, chances are you're familiar with the pages directory architecture. And in case you haven't exactly kept track to the new experimental releases since Next.js 13, there will be some catch-up to do before you start using and understanding the App Directory.
Before going into the Next.js specifics, let's first understand our goals with this project. Visualizing the mental model is an important step to ensure your user's data is switching hands as little as possible.
A diagram is probably the fastest way to visualizing a process. This is important to see if there aren't any redundant calls, or if any of those requests are chained in some condition. Chained requests are the grim reapers of perceived performance, we need to get those out of the way as soon as possible.
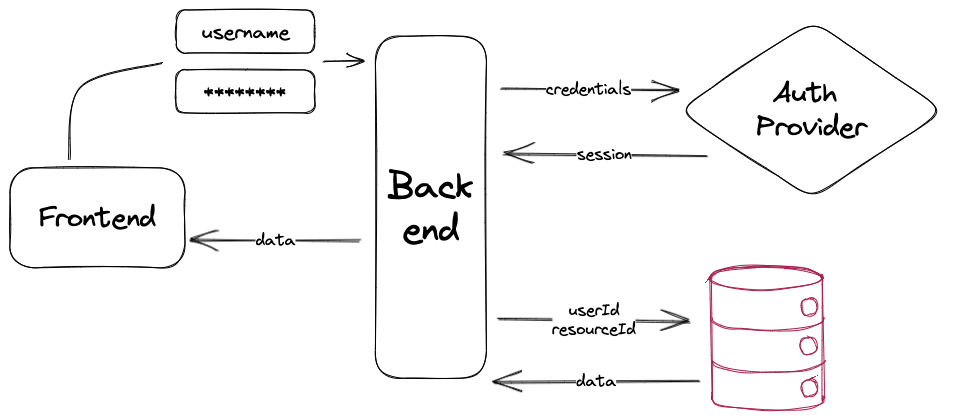
In the above graph, we have “Frontend” and “Backend” that are both handled by Next.js. We have the “auth provider” which our app is connected to via Auth.js (within a Next.js endpoint), and we have Xata as our database, connecting as well via Next.js’ backend layer. We can examine and translate the flow of that diagram into 3 steps:
- Authentication
Provider performs user authentication, the library creates a
sessionand the app receives that as apayloadfrom the auth request. - Resource Request
Authenticated User performs request with
resourceId, app takesuserIdfromsession - Granting Access
Xata filters all resources from table to only the ones owned by
userIdand returns (if exists) the one withresourceId
Now that we aligned ourselves about the target implementation, it's time to roll up our sleeves and start writing some code. First, let's prepare the authentication endpoint.
When working with Auth.js and Next.js, everything starts with a very special API Route. We create a dynamic catch-all route: api/[...nextauth].ts. There's a lot to unpack on this naming pattern for first timers, let's have a quick look:
- Everything inside
/pages/api/authis a resource route in Next.js, it will either be a Serverless Function or an Edge Function depending on the runtime you choose. - Filenames surrounded by square brackets (
[]) indicate this route is dynamic, so it will take the corresponding segment path and add to the search params of the route. E.g.:[slug].jswill serve[serverless.com/xata](<http://serverless.com/xata>)and receive{ slug: "xata" }as a parameter. - By adding the spread (
…) to the param, we indicate we take all segment paths. So not only/api/xatabut also/api/xata/auth/another/routewill be rendered by that route. Hence why we namespace our catch-all route inside/auth
There is currently an opened issue within the Auth.js repository to support the new Route Handlers, if your intention is going full
/appdirectory, keep an eye on it. Otherwise, everything will work just fine keeping the API Route inside/pages.
Our Serverless Route will then import NextAuth as a high order function, this will handle the necessary routes the library will need to implement and we will only pass the configuration object to it. Xata has an adapter, which means once the authentication is done, Auth.js will itself create an entry into a Xata database for that user, so the authentication provider will only be used for registering the user and sign-in. Auth.js has a big number of authentication providers, for this example we will use GitHub. Your /pages/api/auth/[...nextauth].ts will then look like this:
import NextAuth from 'next-auth';
import GitHubProvider from 'next-auth/providers/github';
import { XataAdapter } from '@next-auth/xata-adapter';
import { XataClient } from '~/shared/xata.codegen';

const client = new XataClient();

export const authConfig = {
  adapter: XataAdapter(client),
  providers: [
    GitHubProvider({
      clientId: process.env.GITHUB_ID,
      clientSecret: process.env.GITHUB_SECRET
    })
  ]
};

export default NextAuth(authConfig);
With that, Auth.js is ready to authenticate and provide our app with a valid session to fetch user specific data. Now it's time to setup our database our app can communicate to Xata, it is important to setup a workspace and push our schema to it. First ,take the following json and save it somewhere:
{
  "tables": [
    {
      "name": "nextauth_users",
      "columns": [
        {
          "name": "email",
          "type": "email"
        },
        {
          "name": "emailVerified",
          "type": "datetime"
        },
        {
          "name": "name",
          "type": "string"
        },
        {
          "name": "image",
          "type": "string"
        }
      ]
    },
    {
      "name": "nextauth_accounts",
      "columns": [
        {
          "name": "user",
          "type": "link",
          "link": {
            "table": "nextauth_users"
          }
        },
        {
          "name": "type",
          "type": "string"
        },
        {
          "name": "provider",
          "type": "string"
        },
        {
          "name": "providerAccountId",
          "type": "string"
        },
        {
          "name": "refresh_token",
          "type": "string"
        },
        {
          "name": "access_token",
          "type": "string"
        },
        {
          "name": "expires_at",
          "type": "int"
        },
        {
          "name": "token_type",
          "type": "string"
        },
        {
          "name": "scope",
          "type": "string"
        },
        {
          "name": "id_token",
          "type": "text"
        },
        {
          "name": "session_state",
          "type": "string"
        }
      ]
    },
    {
      "name": "nextauth_verificationTokens",
      "columns": [
        {
          "name": "identifier",
          "type": "string"
        },
        {
          "name": "token",
          "type": "string"
        },
        {
          "name": "expires",
          "type": "datetime"
        }
      ]
    },
    {
      "name": "nextauth_users_accounts",
      "columns": [
        {
          "name": "user",
          "type": "link",
          "link": {
            "table": "nextauth_users"
          }
        },
        {
          "name": "account",
          "type": "link",
          "link": {
            "table": "nextauth_accounts"
          }
        }
      ]
    },
    {
      "name": "nextauth_users_sessions",
      "columns": [
        {
          "name": "user",
          "type": "link",
          "link": {
            "table": "nextauth_users"
          }
        },
        {
          "name": "session",
          "type": "link",
          "link": {
            "table": "nextauth_sessions"
          }
        }
      ]
    },
    {
      "name": "nextauth_sessions",
      "columns": [
        {
          "name": "sessionToken",
          "type": "string"
        },
        {
          "name": "expires",
          "type": "datetime"
        },
        {
          "name": "user",
          "type": "link",
          "link": {
            "table": "nextauth_users"
          }
        }
      ]
    }
  ]
}
And now if you have our CLI installed, you can use the xata namespace, otherwise npx @xata.io/cli@latest will also work:
xata init --schema="path/to/schema.json"
Finally, all code is in place to:
- Connect to GitHub OAuth
- Create a session within our Next.js app
- Push user registration to our Xata database
What we need now is a set of keys to effectively connect to those services in a secure way.
The environment variables GITHUB_ID and GITHUB_SECRET are provided by GitHub once you register an OAuth App. For your code to run properly you will need to have a .env (or .env.local) file looking like:
# Xata specifics
XATA_API_KEY=<Xata API Key>
XATA_BRANCH=main

# GitHub OAuth specifics
GITHUB_ID=<id of your Provider OAuth app for this environment>
GITHUB_SECRET=<secret of your Provider OAuth app for this environment>

# Auth.js specifics
NEXTAUTH_URL=http://localhost:3000 # if in local dev
NEXTAUTH_SECRET=<a random secret string>
Finally, it's time to manage some data.
There are a few ways with which you can provide secure access to routes in your Auth.js app. One is via the Auth.js middleware, this will redirect anyone without a session automatically to the login route you set up. This approach should work in both App Directory and Pages Directory.
If working with the Pages Directory, you must set the <SessionProvider> encapsulating routes that should have access to the Session (if using getStaticProps), or check the session within getServerSideProps and pass it down as render props.
Lastly, in the app directory, the best way is to use getServerSession method, which will retrieve the method in every Server Component that needs to use it. This is close to what getServerSideProps can do, though it's on a component level - while on getServerSidePropswe're dealing at route level.
When working with React Server components, don't worry about firing multiple requests, it always hit the same endpoint and therefore Next.js will be able to deduplicate it, so there will only be one fetch request.
Once we got Auth setup, we can treat Row-Level Security (RLS) as an if/else statement. For example, take this contrived profile page:
import { fetchUserData } from '~/lib/db.server.ts'
import { getSession } from 'next-auth/react'

export default function Profile({ user, userData }) {
	return ( /** React component **/ )
}

export const getServerSideProps = async ({
  req,
  res,
}) => {
  const session = await getSession({ req })

  return {
    props: {
      user: session?.user,
      todos: await fetchUserData(session?.user.email),
    },
  }
}
In the above example, we are using the user's email as their unique identifier (or primary key). And we implemented a getter in a file named db.server.ts. Let's see how that looks like using the Xata SDK.
// the file generated via our CLI
import { getXataClient } from '~/lib/xata.codegen.server';

const xata = getXataClient();

export const fetchUserData = async (email: string) => {
  const userData = await xata.db.itemList
    .filter({
      user: {
        email
      }
    })
    .sort('created_at', 'desc')
    .getPaginated({ pagination: { size: 100, offset: 0 } });

  return userData;
};
Remember, this method may only be accessed from the server-side. In Next.js this means:
- from a React Server Component
- from
getStaticProps,getStaticPaths, orgetServerSideProps - from a Middleware, Serverless Function, or Edge Function
To retrieve data from the client-side, we would need a different method that sends a POST request to an API Route or a Route Handler, for example:
export const fetchData = async (userEmail: string) => {
  const response = await fetch('/api/fetch-data', {
    method: 'post',
    body: JSON.stringify({
      userEmail
    })
  });

  if (response.ok) {
    return response;
  } else {
    const err = await response.json();
    throw new Error(`ERROR [${response.status}]: ${err.message ?? 'The server returned an error'}`);
  }
};Now that we are done, you can compare your code or check the components that we wrote to use this logic in our examples repository:
I hope this article has helped you getting started with Row-Level Security and got you through the door with using Auth in a Next.js app with no vendor lock-in and owning your data. If any questions remain, reach Atila both on our discord or on twitter.
Start free,
pay as you grow
Xata provides the best free plan in the industry. It is production ready by default and doesn't pause or cool-down. Take your time to build your business and upgrade when you're ready to scale.
- Single team member
- 10 database branches
- High availability
- 15 GB data storage
- Single team member
- 10 database branches
- High availability
- 15 GB data storage
Copyright © 2025 Xatabase Inc.
All rights reserved.