Building a Retrieval-Augmented Generation Chatbot with SvelteKit and Xata Vector Search
Learn how to create a Retrieval-Augmented Generation Chatbot using Xata, SvelteKit, LiteLLM, TailwindCSS and Vercel.
Written by
Rishi Raj Jain
Published on
February 28, 2024
In this post, you'll create a Retrieval-Augmented Generation Chatbot using Xata, SvelteKit, LiteLLM, TailwindCSS and Vercel. You'll learn how to:
- Set up Xata
- Create a schema with different column types
- Using LiteLLM to Create Vector Embeddings
- Using Xata to Store Vector Embeddings with Metadata
- Using Xata Vector Search to Create Relevant Context
- Using Replicate Predictions to Prompt LLAMA 2 70B Chat Model
- Wiring Up Chatbot UI in SvelteKit
You'll need the following:
- A Xata account
- Node.js 18 or later
- An OpenAI account
- A Replicate account
- A Vercel Account
| Technology | Description |
|---|---|
| Xata | Serverless database platform for scalable, real-time applications |
| SvelteKit | UI framework that uses a compiler to let you write breathtakingly concise components |
| LiteLLM | Call all LLM APIs using the OpenAI format |
| Replicate | Platform to run and fine-tune open-source models |
| TailwindCSS | CSS framework for building custom designs |
| Vercel | A cloud platform for deploying and scaling web applications |
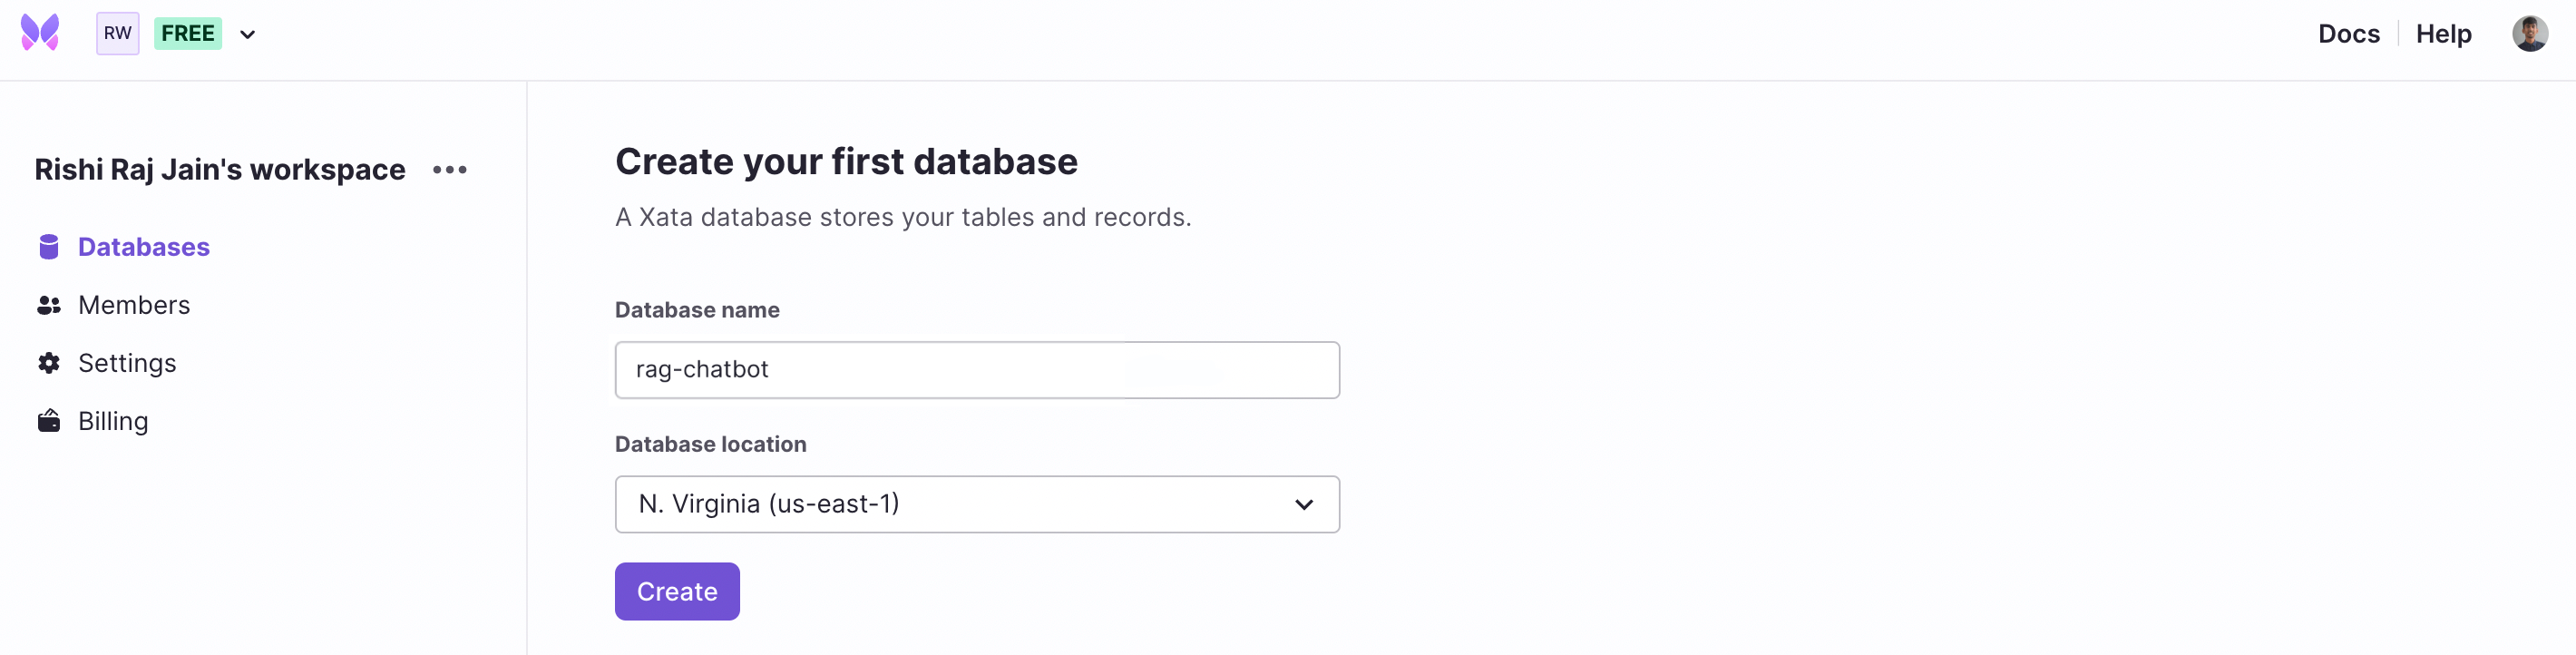
After you've created a Xata account and are logged in, create a database.
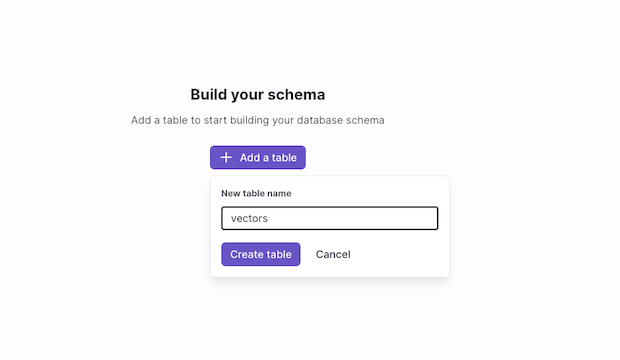
The next step is to create a table, in this instance vectors, that will contain all the vector embeddings along with their metadata.
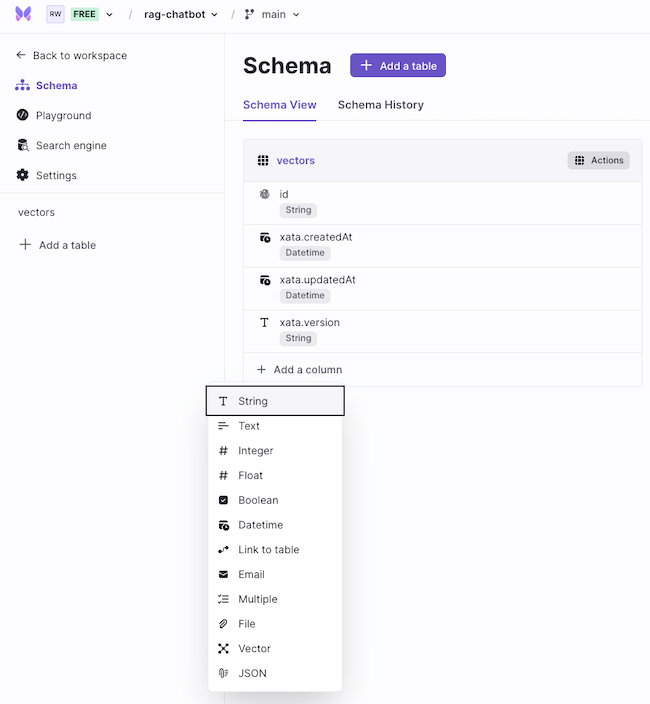
Let’s move on to adding relevant columns in the table you've just created.
In the vectors table, you want to store all the vector embeddings along with metadata (such as string content) so that you can use metadata of the relevant vector(s) to create context for prompting the LLAMA 2 70B Chat model.
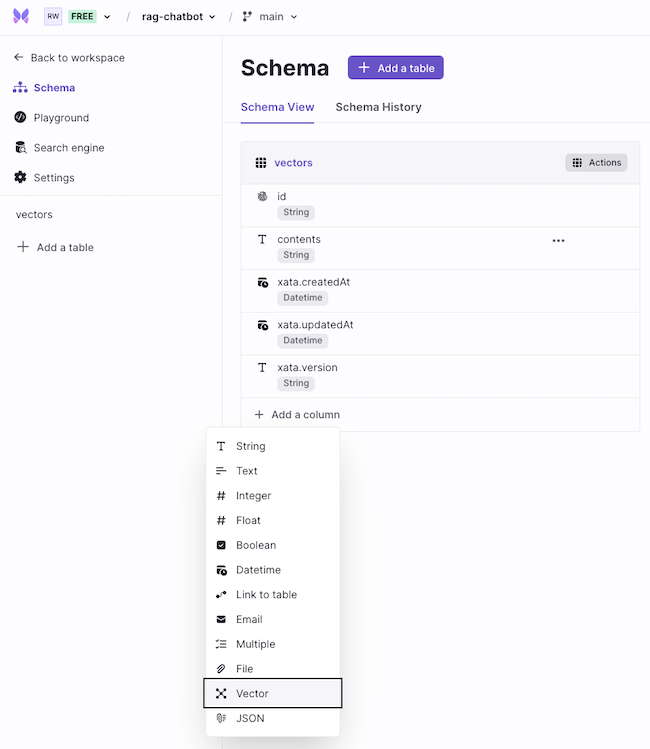
First, click + Add column and select String.
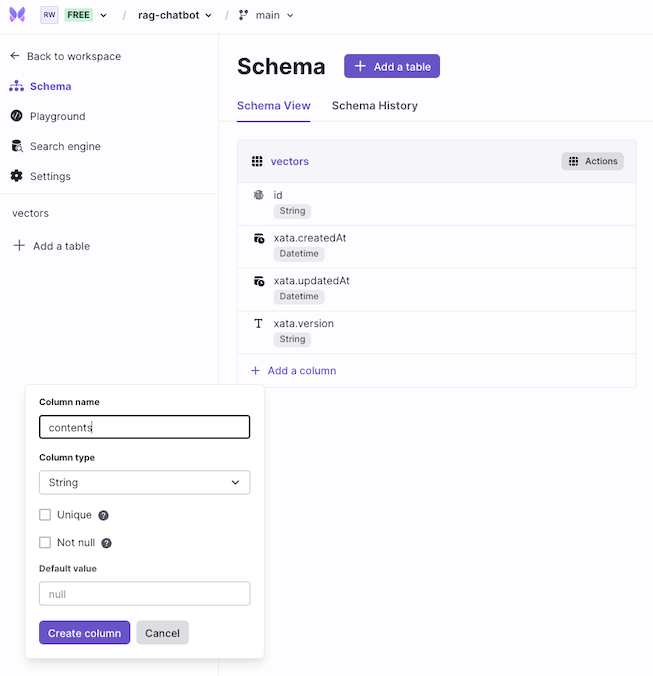
Proceed with adding the column name as contents. This column is responsible for storing the metadata as String type.
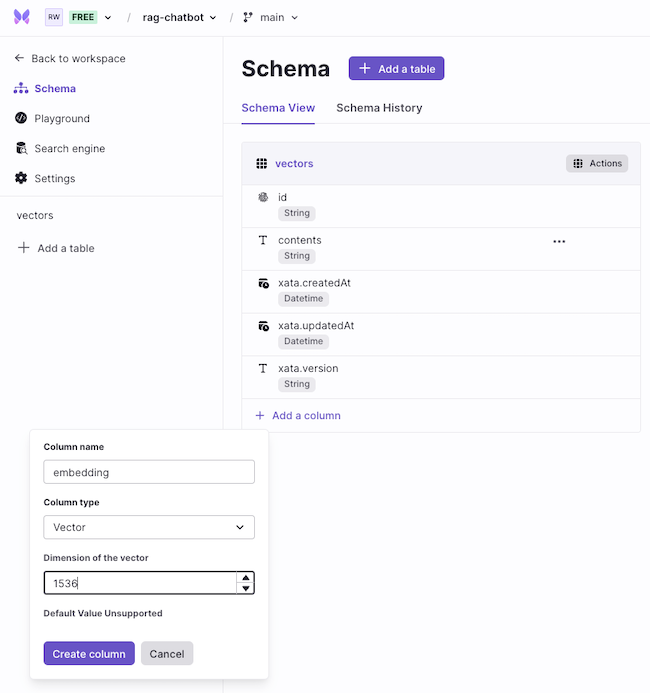
Next, proceed to add another column name as embedding. This column is responsible for storing the vector embedding generated via OpenAI as vector type.
Among multiple embedding models offered by OpenAI, the text-embedding-3-small model is one of the newest and performant embedding models. The length of the vector embedding generated via the text-embedding-3-small model is 1536.
Enter the default value of the length of the vector embedding equal to 1536.
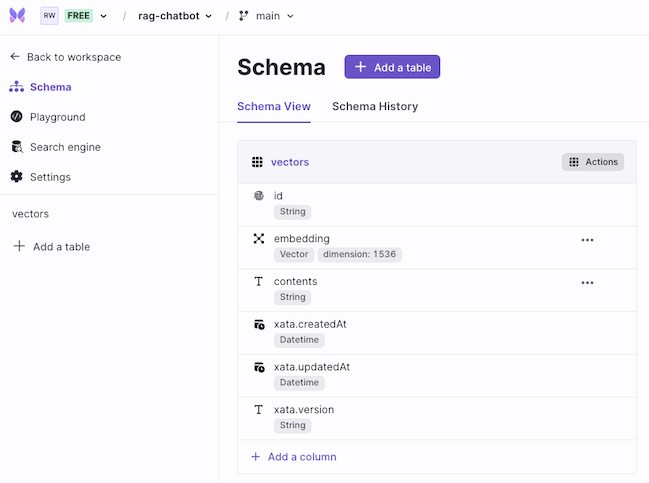
Lovely! With all that done, the final schema shall be shown as below 👇🏻
Clone the app repository and follow this tutorial; you can fork the project by running the following command:
git clone https://github.com/rishi-raj-jain/xata-rag-chatbot
cd xata-rag-chatbot
pnpm installTo seamlessly use Xata with SvelteKit, install the Xata CLI globally:
npm install -g @xata.io/cliThen, authorize the Xata CLI so it is associated with the logged in account:
xata auth login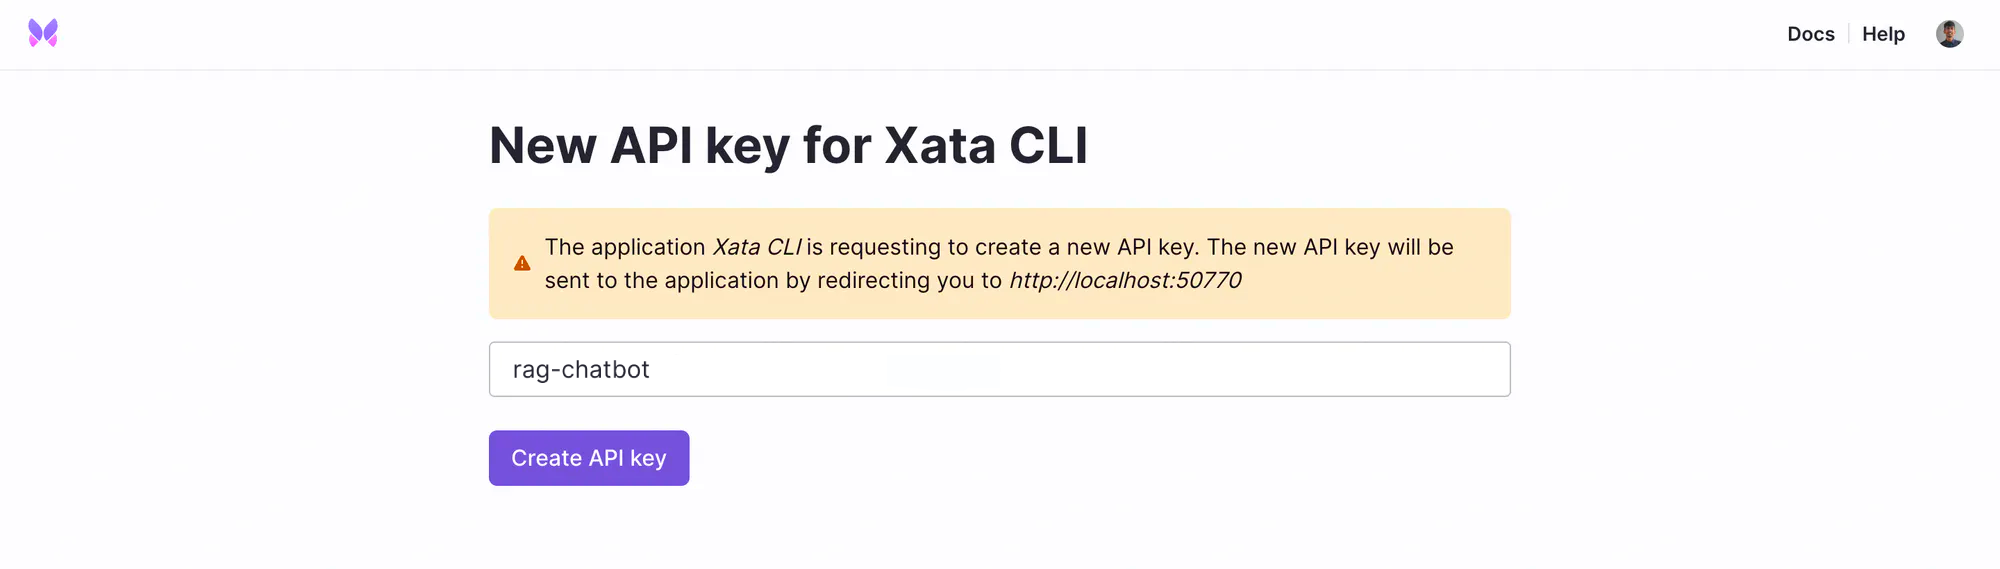
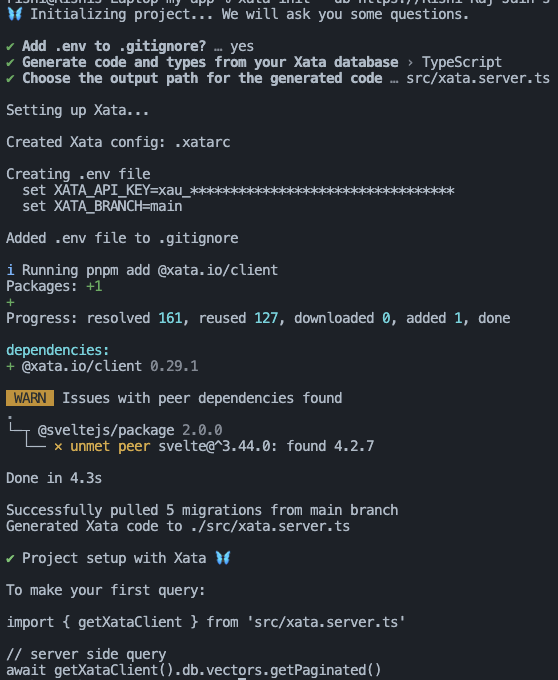
Great! Now, initialize your project locally with the Xata CLI command:
xata init --db https://Rishi-Raj-Jain-s-workspace-80514q.us-east-1.xata.sh/db/rag-chatbotUse the following answers to the Xata CLI one-time setup question prompts to integrate Xata with SvelteKit:
Yeswhen prompted to add.envto.gitignore.TypeScriptwhen prompted to select the language to generate code and types from your Xata database.src/xata.server.tswhen prompted to enter the output path for the generated code by the Xata CLI.
To use OpenAI Embedding models using LiteLLM, we need to make sure that the OPENAI_API_KEY exists as an environment variable. Refer to the following OpenAI doc on how to find your API Key: Where do I find my OpenAI API Key?
# OpenAI API Key
OPENAI_API_KEY="sk-..."
With LiteLLM, you can call 100+ LLMs with the same OpenAI-like input and output. To create an embedding vector from a string content, we use the embedding method from litellm with text-embedding-3-small as the model. By default, the length of the embedding vector will be 1536 for text-embedding-3-small. Using the OpenAI output format, we obtain the embedding vector from the first object in the data array returned.
// File: src/routes/api/chat/+server.ts

import { embedding } from 'litellm';

export async function POST({ request }: RequestEvent) {
  // Generate embeddings of a message using OpenAI via LiteLLM
  const embeddingData = await embedding({
    model: 'text-embedding-3-small',
    input: 'Rishi is enjoying using LiteLLM'
  });

  // Using the OpenAI output format, obtain the embedding vector stored in
  // the first object of the data array
  const getEmbeddingVector = embeddingData.data[0].embedding;
}We’ll use the Xata Serverless database platform (powered by PostgreSQL) to store the content from which the embedding vector was created, and the embedding vector itself. It’s as easy as inserting a record in your database. Here’s the code on how to add each vector with it’s content to the vectors table in your Xata database.
// Upsert the vector with description to be used further
// as the context to upcoming questions
xata.db.vectors.create({
  contents: message,
  embedding: embeddingData.data[0].embedding,
}),
Storing vectors in a database helps us create context when generating chatbot responses on the fly including the latest content added. To add embedding vectors along with metadata dynamically, we create a Server Side Rendered SvelteKit endpoint to accept messages (a string array) in the POST request. Using messages, we create embeddings and insert them into our Xata database.
// File: src/routes/api/context/warm/+server.ts

import { embedding } from 'litellm';
import { getXataClient } from '@/xata.server';

// Load the in-memory Xata client
const xata = getXataClient();

export async function POST({ request }: RequestEvent) {
  // Set of messages to create vector embeddings on
  const { messages = [] } = await request.json();

  // Call the OpenAI API to get embeddings on the messages
  const generatedEmbeddings = await Promise.all(
    messages.map((input: string) => embedding({ input, model: 'text-embedding-3-small' }))
  );

  // Insert all of them into Xata Embedding with the content
  await Promise.all(
    generatedEmbeddings.map((embeddingData, index) =>
      // Upsert the vector with description to be further as the context to upcoming questions
      xata.db.vectors.create({
        contents: messages[index],
        embedding: embeddingData.data[0].embedding
      })
    )
  );
}We’ll use the Xata Vector Search to perform similarity search on your data based on the latest query’s dynamically generated embedding vector. It’s as easy as retrieving a record in your database. Here’s the code on how to find the 5 most similar embedding vectors to the latest user query vector in your Xata database.
// Fetch the relevant set of records based on the embedding
const relevantRecords = await xata.db.vectors.vectorSearch(
  // Column Name
  'embedding',
  // Embedding Vector
  embeddingData.data[0].embedding,
  // Count of relevant vector embeddings
  { size: 5 }
);
With each relevant embedding vector, each record of your Xata database is returned. This allows us to obtain the metadata associated with these vectors and use them to create the context for the AI to answer with. In the code below, we simply create a string containing all the metadata from the relevant vectors returned in our search.
// File: src/routes/api/context/warm/+server.ts

import { embedding } from 'litellm';
import { getXataClient } from '@/xata.server';

// Load the in-memory Xata client
const xata = getXataClient();

export async function POST({ request }: RequestEvent) {
  // Set of messages to create vector embeddings on
  const { messages = [] } = await request.json();

  // Get the latest question stored in the last message of the chat array
  const userMessages = messages.filter((i: any) => i.role === 'user');
  const input = userMessages[userMessages.length - 1].content;

  // Generate embeddings of the latest question using OpenAI
  const embeddingData = await embedding({ input, model: 'text-embedding-3-small' });

  // Fetch the relevant set of records based on the embedding
  const relevantRecords = await xata.db.vectors.vectorSearch('embedding', embeddingData.data[0].embedding, { size: 5 });

  // Combine all the metadata of the relevant vectors
  const systemContext = relevantRecords.records.map((i) => i.contents).join('\n');
}To prompt Meta’s LLAMA 2 70B Chat model, we’ll use Replicate which allows us to run the model with just an API call. In our case, we make use of the replicate package, saving us from the need to write a fetch api by ourselves and handle streaming responses natively. We need to make sure that the REPLICATE_API_TOKEN is set as an environment variable. Go to your Replicate’s Account Settings > API tokens to obtain your Replicate API token.
import Replicate from 'replicate'

// Instantiate the Replicate API
const replicate = new Replicate({
  auth: process.env.REPLICATE_API_TOKEN,
}
Using Vercel’s AI SDK baked-in experimental_buildLlama2Prompt function, we’re able to:
- Pass instructions so that the code blocks in the markdown-like responses generated by AI are prepended with ```. This'll help us highlight them in our frontend setup via a syntax highlighter. This is done via creating a message with the role of
assistantand passing our relevant instructions in thecontentfield. - Pass the dynamically generated context (as string) for the AI to consider before generating responses. This is done via creating a message with the role of
systemand passing our relevant context string in thecontentfield. - Pass the whole conversation between user and chatbot as
messages, which contains each message with its relevantcontentandrolefield.
import { experimental_buildLlama2Prompt } from 'ai/prompts';

// Now use Replicate LLAMA 70B streaming to perform the autocompletion with context
const response = await replicate.predictions.create({
  // You must enable streaming.
  stream: true,
  // The model must support streaming. See https://replicate.com/docs/streaming
  model: 'meta/llama-2-70b-chat',
  // Format the message list into the format expected by Llama 2
  // @see https://github.com/vercel/ai/blob/99cf16edf0a09405d15d3867f997c96a8da869c6/packages/core/prompts/huggingface.ts#L53C1-L78C2
  input: {
    prompt: experimental_buildLlama2Prompt([
      {
        // create a system content message to be added as
        // the llama2prompt generator will supply it as the context with the API
        role: 'system',
        content: systemContext
      },
      {
        // create a system instruction
        // make sure to wrap code blocks with ``` so that the svelte markdown picks it up correctly
        role: 'assistant',
        content: `When creating responses sure to wrap any code blocks that you output as code blocks and not text so that they can be rendered beautifully.`
      },
      // also, pass the whole conversation!
      ...messages
    ])
  }
});Using Vercel's AI SDK we’re able to save tremendous time in setting up a reactive chatbot UI in SvelteKit. The useChat utility from ai/svelte encapsulates the frontend logic to maintaining the array of messages exchanged between the user and the chatbot, submitting form responses to the relevant API endpoint with the messages exchanged, and stream content right into the UI from the streaming API response.
<script lang="ts">
  // File: src/routes/+page.svelte
  import { useChat } from 'ai/svelte';
  import MemoizedMD from '@/markdown/MemoizedMD.svelte';
  import ChevronRight from '@/icons/ChevronRight.svelte';
  import InputElement from '@/lib/components/ui/input/input.svelte';

  const { input, handleSubmit, messages } = useChat();

  function capitalizeFirstLetter(input: string) {
    return input.charAt(0).toUpperCase() + input.slice(1);
  }
</script>

<div class="flex flex-col items-center">
  <div class="relative flex w-full max-w-lg flex-col items-start overflow-hidden px-5">
    <form on:submit="{handleSubmit}" class="fixed bottom-4 flex w-[75vw] max-w-[500px] flex-row items-center space-x-2">
      <InputElement
        id="message"
        type="message"
        autocomplete="off"
        bind:value="{$input}"
        placeholder="What's your next question?"
        class="rounded border-black/25 placeholder:text-black/75 hover:border-black"
      />
      <button
        class="absolute right-3 flex size-6 flex-col items-center justify-center rounded-full border border-black/50 hover:bg-black hover:text-white"
        type="submit"
      >
        <ChevronRight />
      </button>
    </form>
    <div class="flex max-h-[90vh] w-full flex-col overflow-y-scroll">
      {#each $messages as message}
      <div class="mt-3 h-[1px] w-full bg-white" />
      <span class="max-w-max rounded border px-2 py-1 text-xs"> {capitalizeFirstLetter(message.role)} </span>
      <div class="mt-2 h-[1px] w-full bg-white" />
      <MemoizedMD message="{message.content}" />
      <div class="mt-3 h-[1px] bg-black/10" />
      {/each}
    </div>
  </div>
</div>
Using the svelte-markdown package, we’re able to visually format the responses returned by the chatbot API route for the user. Breaking HTML into components of their own tags (such as <code> and <a>), we’re able to selectively pass our own Svelte components containing their own processing logic. In this example, we create our custom Code svelte component to touch up the <code> element’s visual appearance.
<script lang="ts">
  // File: src/markdown/MemomizedMD.svelte
  import Code from './Code.svelte';
  import SvelteMarkdown from 'svelte-markdown';

  export let message: string;
</script>

<SvelteMarkdown source={message} renderers={{ code: Code }} />
Using svelte-highlight package, we’ll specifically highlight the code blocks in the chatbot responses to make them more visually appealing. Within just a few lines, we’re able to create HTML classes for each code block specifically based on its language (by default, we’ve set it to typescript).
<script lang="ts">
  // File: src/markdown/Code.svelte
  import Highlight from 'svelte-highlight';
  import typescript from 'svelte-highlight/languages/typescript';

  export let lang: string;
  export let text: any;
</script>

<Highlight language="{typescript}" code="{text}" />
To make sure the specific HTML classes have their respective CSS styles present, we use the GitHub Light Theme (exported by svelte-highlight) in the app’s parent layout file.
<script lang="ts">
// File: src/routes/+layout.svelte
import github from 'svelte-highlight/styles/github';
</script>
<svelte:head>
{@html github}
</svelte:head>
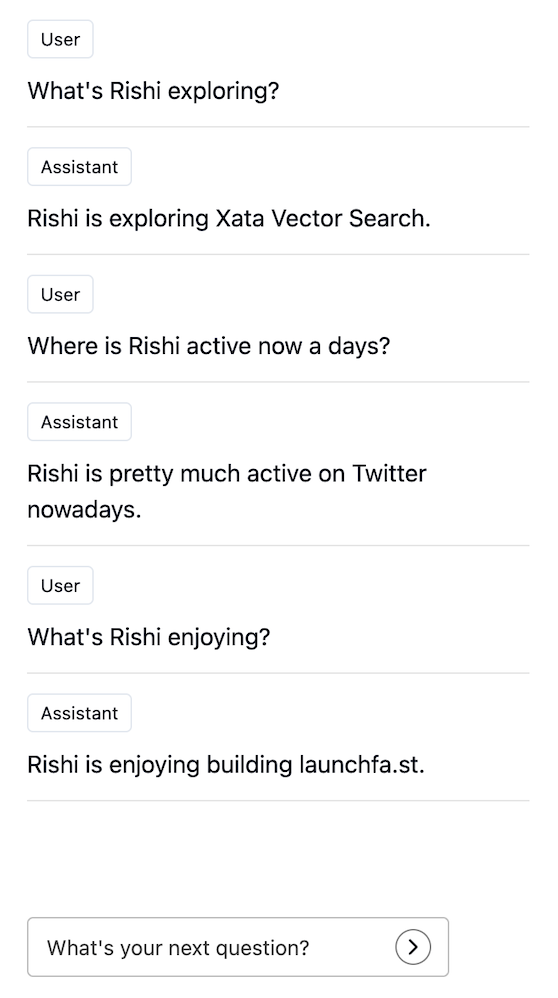
<slot />Here's a preview of what we've successfully created with SvelteKit and Xata 👇🏻
The repository, is now ready to deploy to Vercel. Use the following steps to deploy:
- Start by creating a GitHub repository containing your app's code.
- Then, navigate to the Vercel Dashboard and create a New Project.
- Link the new project to the GitHub repository you just created.
- In Settings, update the Environment Variables to match those in your local
.envfile. - Deploy! 🚀
For more detailed insights, explore the references cited in this post.
| Resource | Link |
|---|---|
| GitHub Repo | https://github.com/rishi-raj-jain/xata-rag-chatbot |
| SvelteKit with Xata | https://xata.io/docs/getting-started/sveltekit |
| Xata Vector Search | https://xata.io/docs/sdk/vector-search |
| How to Prompt Llama 2 | https://huggingface.co/blog/llama2#how-to-prompt-llama-2 |
| SvelteKit AI SDK | https://sdk.vercel.ai/docs/guides/frameworks/sveltekit |
We'd love to hear from you if you have any feedback on this tutorial, would like to know more about Xata, or if you'd like to contribute a community blog or tutorial. Reach out to us on Discord or join us on X | Twitter. Happy building 🦋
Start free,
pay as you grow
Xata provides the best free plan in the industry. It is production ready by default and doesn't pause or cool-down. Take your time to build your business and upgrade when you're ready to scale.
- Single team member
- 10 database branches
- High availability
- 15 GB data storage
- Single team member
- 10 database branches
- High availability
- 15 GB data storage
Copyright © 2025 Xatabase Inc.
All rights reserved.